
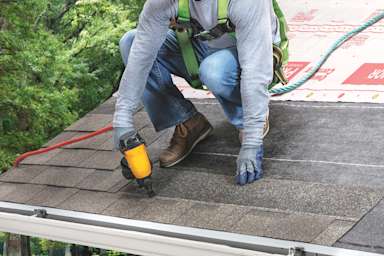


RhinoRoof® High-Temp
Installation InstructionsRhinoRoof® High-Temp
Application Instructions and Preparation
Application Instructions and Preparation
RhinoRoof® High-Temp is a self-adhered underlayment designed as a secondary water barrier for use on steep slope roofs (2:12 or greater) under metal roof shingles and panels or asphalt shingles.
Deck Preparation
The deck must be clean, smooth, and dry before applying RhinoRoof® High-Temp underlayment. Remove all old roofing down to the deck or, in new construction, apply over the new deck. Sweep the deck surface to remove dirt and debris and remove any protruding fasteners. Replace any damaged or rotted deck boards.
To be eligible for an Owens Corning Total Protection Roofing System Warranty when used with Owens Corning asphalt shingles, RhinoRoof® High-Temp underlayment must be applied to a clean, smooth, and dry roof deck. Remove all old roofing materials down to the roof deck.
Allowable Substrates
RhinoRoof® High-Temp self-adhered underlayment can be installed over the following:
- Plywood (standard & fire retardant treated)
- OSB
- Square Edged Deck Boards (min. 6-inch width (nominal) and 3/4-inch thickness, with max. ¼-inch spaces between boards)**
Ventilation
When installing RhinoRoof® High-Temp underlayment over the entire roof deck, proper ventilation is required. The attic must have adequate ventilation as soon as underlayment is installed, even if the roof covering material is not installed right away. Consult a design professional and local building codes for ventilation requirements.
Valley Preparation
For maximum valley protection, the roll width should remain intact and extend 18 inches on either side of the valley. Remove the release liner and press RhinoRoof® High-Temp underlayment into place, working from the center of the valley or ridge outward in each direction. Always apply valleys starting at the low point of the roof and working upward. If an overlap is needed, be sure to overlap the previous piece by a minimum of 4 inches. RhinoRoof® High-Temp underlayment should be applied in valleys before installing eave applications. Do not weave underlayments through the valley.
Deck Edge Preparation For Added Protection
The following deck-edge preparation is recommended for added protection but is not required. Consult local building codes.
Along rakes, apply RhinoRoof® High-Temp underlayment flush with the roof line first, and install drip edge over the RhinoRoof® High-Temp.
If local codes allow, install an 18-inch-wide piece of RhinoRoof® High-Temp parallel to eaves, extending a minimum of 4 inches and maximum of 6 inches down the fascia. Then, install metal drip edge over top of the RhinoRoof® High-Temp unless otherwise directed by local building codes.
Step 1
Ensure that decking substrate is acceptable to roof covering manufacturer.
Step 2
Unroll RhinoRoof® High-Temp underlayment and cut into 15-20 ft. lengths. Allow the material to relax for 3-5 minutes in a shaded area before installing.
Step 3
Loosely reroll each section for transport to the roof.
Step 4
Prime the drip edge at the eaves with an ASTM D41 compliant primer. Starting at the eaves, install RhinoRoof® High-Temp parallel to the eave edge, with the lower edge of the RhinoRoof® High-Temp flush with the outside of the primed drip edge. The lower edge of the underlayment is the edge that does not have a selvage edge.
Step 5
After installation of each piece on slopes of 3:12 or greater, remove the release lining from the selvage and secure the selvage spaced at 6 inches on center with minimum 12-gauge roofing nails, or other fasteners in accordance with local building codes and/or product approvals. Nails should be of sufficient length to penetrate the roof sheathing by at least 3/4 inch, or through the roof sheathing. Plastic cap nails are not acceptable for use in this application. Consult local building codes for fastener requirements.
Note: Where penetrations are present (such as plumbing vents) that impede the path of a horizontal course, create an X-shaped opening for the pipe to pass through the course of RhinoRoof® High-Temp before removing the release liner. To aid in proper placement, consider marking the location of the penetration on the RhinoRoof® High-Temp facer, creating the X-cut and beginning application of that section at the pipe and work outward. Wrap the flaps of material created by the X-cut up the penetration. Be sure to maintain overlap requirements as you work outward from the penetration.
Step 6
Overlap at least 6 inches where a section of RhinoRoof® High-Temp meets another section in the same course. Apply heavy hand pressure or use a roller along the seam created by the 6-inch overlap. End laps should be offset to a minimum of 6 feet on adjacent courses.
For slopes 2:12 through 3:12: the entire RhinoRoof® High-Temp roof surface must be rolled after installation using a minimum 40 lb. roller. In addition, hand rolling along the selvage and for at least 4 inches directly above the selvage is recommended using a roller that is a minimum of 4 inches wide and weighs at least 10 lbs.
For slopes greater than 3:12: hand rolling along the selvage and for at least 4 inches directly above the selvage is recommended using a minimum 4-inch-wide, 10 lb. roller. For the field of the roof, a push broom with applied pressure may be used in place of a 40 lb. roller to improve installer safety.
Step 7
On slopes where a valley is present, each course should overlap 6 inches on the RhinoRoof® High-Temp that was installed in the valley, as described in the ‘Valley Preparation’ section above. This should result in a diagonal line of RhinoRoof® High-Temp running up the valley for each succeeding course.
TIP: Where a valley is present, place a chalk line 6 inches from the outer edge of the valley lining on both sides to ensure proper overlap and aid installation by pre-determining the termination point for each course.
Step 8: Head Wall Installation
Step 8: Head Wall Installation
Head Wall Installation for Full-Deck Applications:
Install RhinoRoof® High-Temp so the last course extends a minimum of 4 inches and maximum of 6 inches up the headwall where it meets the roof deck. Alternatively, once all courses are installed flush with the headwall, strip in an additional piece of RhinoRoof® High-Temp to extend a minimum of 4 inches and maximum of 6 inches up the headwall and 12 inches down the roof deck. Use hand pressure to ensure the RhinoRoof® High-Temp is flush to the inside corner of the headwall-to-roof deck intersection to avoid bridging. This piece of RhinoRoof® High-Temp should extend approximately 8 inches around the side wall, where applicable.
Step 9: Side Wall Installation
Step 9: Side Wall Installation
Side Wall Installation for Full-Deck Applications:
For any side wall application, run the course of RhinoRoof® High-Temp flush with the side wall. Once all horizontal courses are installed, strip in an additional piece of RhinoRoof® High-Temp vertically with the roof slope, extending a minimum of 4 inches and a maximum of 6 inches up the side wall and 12 inches onto the roof deck. Use hand pressure to ensure the RhinoRoof® High-Temp is flush to the angle of the front wall-roof deck intersection to avoid bridging. This piece of RhinoRoof® High-Temp should extend approximately 8 inches around the side wall, where applicable. ASTM C920-compliant sealant should be applied at the seam created at the finished intersection of the front and side wall application of RhinoRoof® High-Temp.
Step 10: Penetration Installation
Step 10: Penetration Installation
For all circular penetrations (ex: vents, plumbing, etc.), create a 24-inch by 24-inch square target patch of RhinoRoof® High-Temp. Find and mark the center of the patch then mark a circle matching the circumference of the penetration around that center mark. Cut a hole in the patch following the marked circle. Slide the patch down the penetration until it sits flush with the roof deck. There should be a minimal (< 0.5 inch) gap between the patch and the pipe. Use ASTM C920 approved sealant to fill any gap created between the patch and the pipe before installing a pipe boot or similar.
TIP: When installing a pipe boot, Owens Corning recommends installing a rain sleeve over the top of the pipe boot where it meets the pipe to protect the life of the pipe boot.
Step 11: Hip and Ridge Application
Step 11: Hip and Ridge Application
At the hips and ridges of the roof, a course of RhinoRoof® High-Temp should be extended up and over the hip or ridge and should extend a minimum of 6 inches onto the other roof slope. Cut the RhinoRoof® High-Temp to accommodate a ridge vent, where applicable.
Step 12: For slopes 2:12 through 3:12
The entire RhinoRoof® High-Temp roof surface must be rolled after installation using a minimum 40 lb. roller. In addition, hand rolling along the selvage and for at least 4 inches directly above the selvage is recommended using a roller that is a minimum of 4 inches wide and weighs at least 10 lbs.
Step 13: For slopes greater than 3:12
Hand rolling along the selvage and for at least 4 inches directly above the selvage is recommended using a minimum 4-inch-wide, 10 lb. roller. For the field of the roof, a push broom with applied pressure may be used in place of a 40 lb. roller to improve installer safety.
Precautions
Precautions
1. Cover RhinoRoof® High-Temp with metal roof shingles and panels or asphalt shingles. Do not allow RhinoRoof® High-Temp underlayment to remain uncovered for more than 90 days, as extended exposure to sun and weather beyond that timeframe may adversely affect this product’s performance.
2. RhinoRoof® High-Temp underlayment should be installed by a professional roofing contractor.
3. RhinoRoof® High-Temp should be installed horizontally across the roof deck. Vertical installation is not permitted.
4. RhinoRoof® High-Temp underlayment is a moisture and vapor barrier. The spaces under the covered deck area and the attic space must be ventilated in accordance with local building codes.
5. RhinoRoof® High-Temp underlayment is intended for exterior roof application only and is not intended for use on vertical surfaces.
6. Apply RhinoRoof® High-Temp directly to the roof deck unless a mechanically fastened slip sheet is needed and permitted by local codes. If adhering directly to the roof deck, allowable roof deck substrate materials are shown in “Allowable Substrates” section of these instructions.
7. Roof coverings should not be installed over wrinkled or buckled RhinoRoof® High-Temp underlayment.
8. Use extreme caution when installing RhinoRoof® High-Temp underlayment. The RhinoRoof® High-Temp underlayment surface may be slippery even when dry. Use of fall protection is highly recommended. Consult OSHA for guidelines on fall protection (29 CFR 1926.500).
9. For best results, apply RhinoRoof® High-Temp underlayment when the air temperature is over 40°F (5°C) and rising, but below 100°F (38°C). When temperatures are under 40°F (5°C), RhinoRoof® High-Temp underlayment may not fully adhere. Store at room temperature prior to installing the product in cold weather. If applied in temperatures above 100°F (38°C), or exposed to direct sunlight, the release backing may become difficult to remove. If this situation should occur, move the product into a shaded area until the RhinoRoof® High-Temp underlayment is cool. Once cooled, the release backing can be easily removed.
10. Store RhinoRoof® High-Temp in a dry, well-ventilated area. Stand RhinoRoof® High-Temp upright. Do not store at 90°F (32°C) or warmer for extended periods of time.
11. When installing RhinoRoof® High-Temp, always follow local building codes and the roof cladding manufacturer’s instructions for installation of its product.
CAUTION: Read and understand all instructions and precautions before applying RhinoRoof® High-Temp underlayment. Check local building codes prior to application of this product. Follow the recommendations of the roof covering manufacturer, the Metal Roofing Alliance (for metal roof panels) and Asphalt Roofing Manufacturer’s Association (for asphalt shingles).